A20 Line
In this chapter, we’ll look at an annoying quirk of the past and try to deal with it. Ugh? Yay? I’m not really sure to be honest.
What is it?
The A20 line is the physical representation of the 21st bit of a memory access. Due to some peculiarity with the way some old computers had to work, this line had to be disabled by default. Read more here.
If it’s not enabled, some memory accesses (above the 1 MiB mark) will be incorrectly handled (for a proper example, see here).
The thing is, different hardware enabled the A20 line in different ways (I know, it sucks). So our code needs to do the same, or we might break on some other hardware.
A Skeleton of Code
I’m going to create a new file for the A20 line code, since there’s quite a lot of it. The way it’s gonna work is we’ll check if the A20 line is enabled, if it is then we’re done, if it’s not then we do another method of enabling it. Then we check if it’s enabled again (because the method might not have worked), and so on.
We’ll print out a string as well for when we succeed/fail to enable the A20 line. Here’s a20Utility-inl.asm, with function stubs for the ways that we’ll try enabling.
bits 16

%macro finish_if_a20_enabled 0
	call check_a20
	cmp ax, 0
	jne .success
%endmacro

; void try_enable_a20()
try_enable_a20:
	.try:
		finish_if_a20_enabled
		call try_set_a20_bios
		finish_if_a20_enabled
		call try_set_a20_keyboard
		finish_if_a20_enabled
		call try_set_a20_fast
		finish_if_a20_enabled

	.fail:
		mov si, a20FailedMessage
		call print_string
		call reboot

	.success:
		mov si, a20SuccessMessage
		call print_string
		ret

; void try_set_a20_bios()
try_set_a20_bios:
	ret

; void try_set_a20_keyboard()
try_set_a20_keyboard:
	ret

; void try_set_a20_fast()
try_set_a20_fast:
	ret

; void check_a20()
check_a20:
	ret

a20SuccessMessage: db "Info: Enabled A20 line!", CR, LF, 0
a20FailedMessage: db "Error: Failed to enable A20 line!", CR, LF, 0
The only complex problem of this block of code is the macro. Wherever we have finish_if_a20_enabled will be replaced with the code inside the macro. You can now see that the jne .success (jump to .success if ax is not-equal 0) will jump to the .success label in the try_enable_a20 function.
We’ll also need to include this file in our main bootloader.asm file, so let’s do that. We’ll place it after the first sector (in the expanded region), since that area is not limited in space.
%include "a20Utility-inl.asm"
Checking If A20 Is Enabled
The way we check if the A20 line is enabled is a bit odd, but kinda smart. What we do is we write a value to a location that would be affected by the A20 line not being enabled (for example 0x100000). If the A20 line is not enabled this would be the same as writing to an earlier address (0x100000 without the 21st bit would be 0x000000), so we can check that earlier address to see if it has our written value. If it does, the A20 line isn’t working yet.
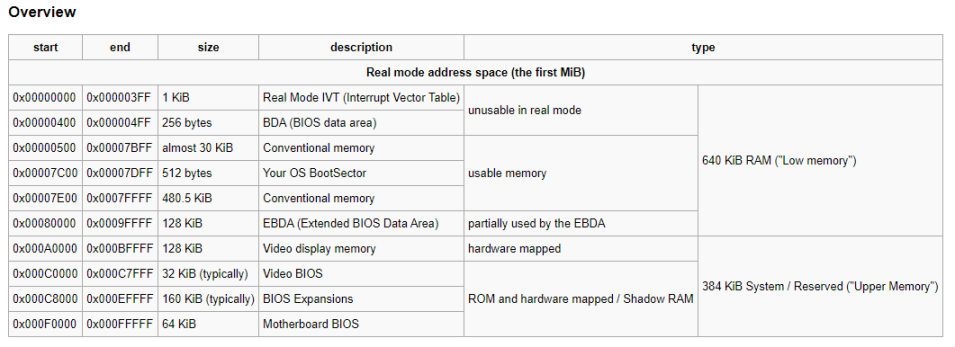
The address we’re going to be using is 0x100500, which will map to 0x000500 if the A20 line is not enabled. Why not simply 0x100000? Well 0x500 is the first bit of usable memory for us, we don’t want to accidently overwrite something important in the BIOS Data Area and have our program crash. Here’s a little overview of the memory layout of the first megabyte, courtesy of the OSDev Wiki.
The Code
The first thing we should do is save the registers (by pushing them onto the stack) that we’re going to be modifying, so that we can restore them later. We’ll also disable interrupts, so the BIOS doesn’t interfere while we’re working on this.
```nasm; void check_a20() check_a20: .setup: ; Saves registers that will be overwritten pushf push ds push es push di push si
	; Disables interrupts
	cli ```
Next, we’ll set those registers to point at what we want. ds:si will be set to point at the location past the 1 MiB mark (0x100500), and es:di will be set to point at the (possibly) same location below the 1 MiB mark (0x000500).
; For es:di
xor ax, ax
mov es, ax
mov di, 0x0500

; For ds:si
mov ax, 0xffff
mov ds, ax
mov si, 0x0510
Alright, we’ll now save the bytes that are actually at that location so that we can restore them later. While we might not have any issues skipping this step, I’d like to err on the safe side. All we’re doing here is moving what’s at those bytes into al, then pushing that onto the stack.
mov al, [es:di]
push ax
mov al, [ds:si]
push ax
Finally, it’s time to conduct the test. This is fairly simple, we’re just moving a value into ds:si and checking if the same value appeared where ds:si is pointing.
.conduct:
	mov byte [es:di], 0x00
	mov byte [ds:si], 0xff
	cmp byte [es:di], 0xff
Before we jump based on the result of the cmp, let’s restore the bytes that were previously there. This is simply doing the opposite of one of the previous steps.
.cleanup:
	pop ax
	mov [ds:si], al
	pop ax
	mov [es:di], al
And finally, we’ll return whether the A20 line is enabled or not. To do this, we’ll simply put either a 0 (not enabled) or a 1 (enabled) in ax before calling ret. That way, the caller (see our macro definition of finish_if_a20_enabled) can check the value of ax to find the return code.
Remember that we also need to cleanup the registers we used, so let’s do that now too.
	mov ax, 0
	je .done
	mov ax, 1

.done:
	pop si
	pop di
	pop es
	pop ds
	popf

	ret
And that’s it! Now whenever we call this function, it’ll check if the A20 line is enabled or not!
Setting A20 via BIOS
We can possibly enable the A20 line through the BIOS, using interrupt 0x15 with ah set to 0x24 and al set to 0x01.
; void try_set_a20_bios()
try_set_a20_bios:
	mov ax, 0x2401
	int 0x15

	ret
Setting A20 via Fast A20
There exists another method of setting the A20 line, called Fast A20 (ironically, this method can be a little slow). It involves reading a value from the IO port 0x92, setting the second bit of that value, then writing it back out to the same port. In code, that looks something like this:
; void try_set_a20_fast()
try_set_a20_fast:
	; Reads, sets bit 2, writes
	in al, 0x92
	or al, 2
	out 0x92, al

	ret
Setting A20 via Keyboard
This page is getting a little long, so for brevity’s sake I’m not going to detail this one here. You can have a look at the OSdev wiki or the PandaOS source for possible implementations.
Final Thoughts
As of now, you should be getting a message that the A20 line was successfully enabled (remember to call try_enable_a20 from your expanded_main). In the next chapter, we’ll look at setting up some tables. I believe we should be jumping to the kernel very soon, hang tight!
See the code in full here.
< Previous Next >